Understanding React Native file structure
Hey, guys welcome to my blog on React Native series. If you are new to this series then please go ahead and check out my previous article to get more clarity on this topic.
Till now we have successfully run our first app on mobile and now it's time to understand the file structure before actually starting to write our code. So let's get started...
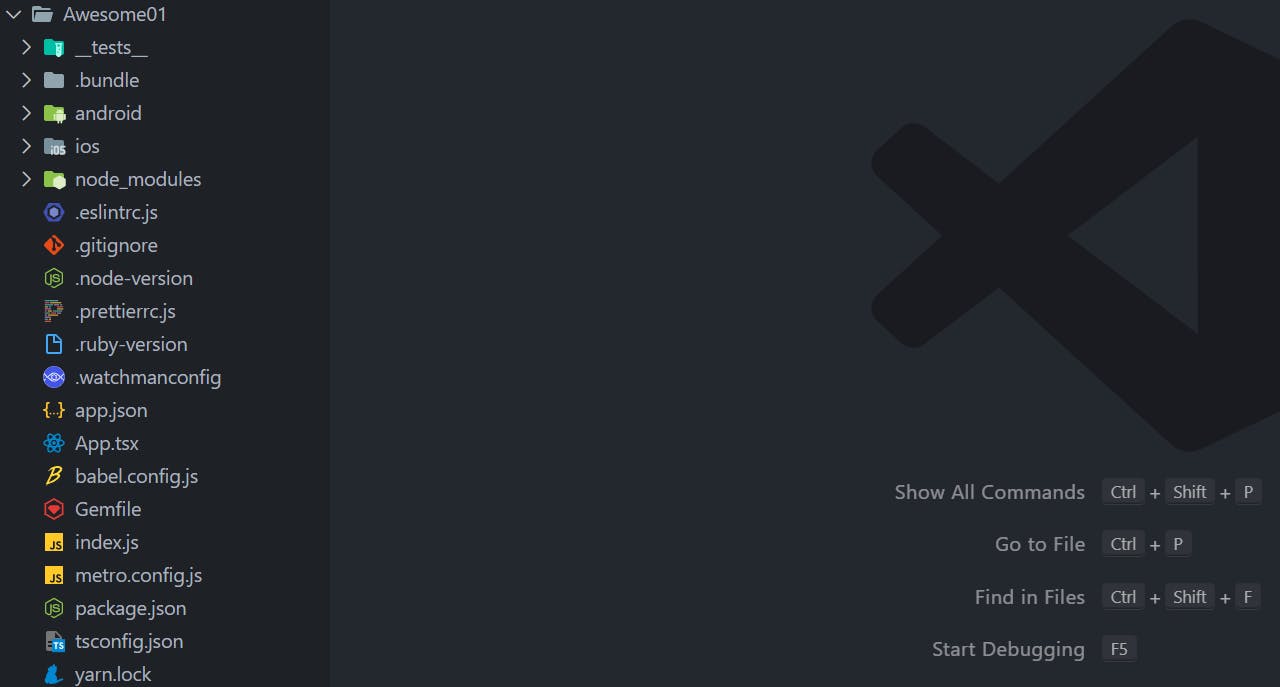
Before going in-depth, please have a look at the file structure in React Native project:

_tests_
This folder is where testers work to test the application.
As we will be focusing on the development of an app using React Native, we are not going to focus on this much as of now.
.bundle
- It has just a configuration file and we never touch that so don't worry about it.
android and ios
React Native allows us to write code once and move that in both android and ios.
That's why you will see android and ios folders one after the other.
You don't need to touch the android folder in most cases but you may need to check this folder for some configurations.
Inside the android folder, we have
build.gradlefile where you might come to specify which minimum SDK version and target SDK version you need to use. Also, you might need to check dependencies over here.You may also visit
local.propertiesfile where you need to mention your SDK directory path. For some people, this is already generated but for some this needs to be created. And if you remember in our previous article we created it manually as I didn't get it generated by default.Similarly, if you are working on an ios machine then you may visit the ios folder and you will only touch Podfile where you will specify all of your dependencies and packages.
node_modules
Since our entire application depends on Nodejs and Javascript, we require node_modules where all dependencies will be installed.
If you get any error/conflict related to dependencies then try deleting node_modules folder then install all dependencies again by running the command
npm installand check if it solves your problem.
.eslintrc.js
This file is a configuration file for a tool named ESLINT.
ESLint is a tool for identifying and reporting patterns found in ECMAScript or JavaScript code, to make code more consistent and avoid bugs.
.gitignore
That's so obvious that you want to show your work to the world. For that, you want to upload your project to git so that it will be accessible to hiring companies.
But there are some unnecessary folders/files like node_modules, .bundle and sensitive files like local.properties that you don't want to share.
So here we can use the .gitignore file to mention such files/folders so that they won't be pushed to Git.
.prettierrc.js
This is a configuration file used by Prettier which is an automated code formatting tool.
This file is just used to ease the coding experience of a developer.
.ruby-version
This is specific to ios versioning which simply specifies the version number.
You can go ahead and change it if you want.
.watchmanconfig
This is a simple tool that constantly re-updates or reloads your application based on changes you are doing and renders on UI.
Here we will provide configurations whenever we will need them.
app.json
- This is where all the files are linked. Your Android and IoS device takes the name of the application from here. It will have basic information about your app.
App.tsx
- This is the main file where you will work for the majority of the time. This is the place from where the input will be taken to render on UI.
babel.config.js
So guys Javascript doesn't know how the different files are being run on our mobile devices. Even, it doesn't know how the files need to be combined to run them as a single application. For that, we need to have some kind of medium or bundler.
The existence of this babel.config.js file will tell React Native to use your custom Babel configuration instead of its own.
Gemfile
- This is a ruby-based file majorly for IoS development and again we never touch this file.
index.js
React Native doesn't know which file needs to be loaded first on UI. In this file, we mention which file needs to be used whether it is App.tsx or Component.tsx.
It uses the AppRegistry package for that and this package is only responsible for running the application both on Android and IoS devices allowing us to write the code only once.
metro.config.js
- This is also a configuration file and we don't touch it most of the time.
package.json
It's a file created by NPM (Node Package Manager). It contains all the metadata, dependencies, and scripts for your app.
This file lists the dependencies, modules or packages that are going to be used within your app.
tsconfig.json
It is a TypeScript configuration file. TypeScript allows us to have strong types.
So to specify from where we need to bring these types we need to have this file.
yarn.lock
This file is auto-generated and should be handled entirely by Yarn.
To get consistent installs across machines, Yarn needs more information than the dependencies you configure in your
package.json.The Yarn needs to store exactly which versions of each dependency were installed. So all such information you will find inside this file.
Uff! Too many folders and files... So guys this is it. I hope this helped you to understand basic things in React Native development. Go through the project you created on your machine and let's meet in the next article to write our own React Native code.
Special Thanks to Hitesh Choudhary !!!